Showing posts with label baking. Show all posts

Saturday, October 5, 2013

Pumpkin Buns

Every year, twice a year actually, we are given the opportunity to listen to the Prophet and Apostles of our Church during General Conference.  We have loved to start traditions with our girls and I admit, most traditions are centered around food.  So, every October when we settle in to listen to conference we look forward to these delicious Pumpkin Cinnamon Rolls aka Pumpkin Buns.  Pumpkin buns are something we look forward to for months ahead of time, they are sinfully delicious.  Topped with cream cheese icing, it really is perfect. 

Pumpkin Buns
Makes 24 buns

2 1/4 tsp active dry yeast
1/4 cup warm water (about 110* Fahrenheit)
1 tsp plus 2 tbsp granulated sugar (honey works great too)
2 eggs
1/4 cup butter, melted
1 can, 15 ounces, solid-pack pumpkin (not pumpkin pie filling)
5 1/2 cups all-purpose flour
3/4 tsp salt
1 tsp pumpkin pie spice (or cinnamon)

Filling:
1/2 cup butter, softened
1/4 cup granulated sugar
1 cup packed light brown sugar
1 tbsp cinnamon (or a mixture of cinnamon and pumpkin pie spice)

Icing:
1 package, 8 ounces, cream cheese
1/4 cup butter softened
1 tsp vanilla
4 cups powdered sugar
1 tbsp milk

1. sprinkle yeast over warm water in the bowl of a stand mixer fitted with a dough hook.  Add 1 tsp of the sugar; let stand until foamy, about 5 minutes.  Beat in remaining 2 tbsp sugar, eggs, butter, and pumpkin.
2. Gradually add 5 cups of the flour, salt, and spices, scraping the sides until a soft dough forms.  Turn your mixer on low and knead for 10 minutes, until smooth.  Dough will be soft.
3. Lightly grease a large bowl.  Add the dough, and cover with plastic wrap and place in a warm spot until doubled in size.
4. Coat two 9x13 pans with baking spray, set aside.  Make Filling: Mix butter, sugar, brown sugar and spices in a bowl.
5. Punch down dough.  Roll out half onto a lightly floured surface to form a 16x10 inch rectangle.  Spread with half of the filling.  Sprinkle raisins, or chocolate chips over sugar mixture.  Starting on one long side, roll up jelly-roll fashion.  Pinch seam to close.  Repeat with second half of dough and filling.
6. Cut each log into 12 equal pieces (about one inch each). Arrange pieces cut side down in prepared baking pan.  Cover with plastic wrap; let sit in a warm spot until buns double in size, about 30 to 45 minutes. (You can refrigerate one pan overnight, or cover plastic wrap with foil and freeze at this point.  Thaw in fridge overnight, then thaw on the counter while preheating the oven.)
7. Heat the oven to 350* Fahrenheit. Uncover pans and bake buns until they are golden brown and bubbly, 28-33 minutes (thawed buns bake for 36 minutes).  Transfer to a wire rack and let cool 10 minutes.
8. For Frosting: in the bowl of a stand mixer fitted with a beater blade, cream the butter and cream cheese until light and fluffy.  Add the powdered sugar a cup at a time, beating after each addition.  Add milk and more whip for 3 minutes. 
9. Spread icing on the just cooled buns and enjoy. 

Sunday, August 4, 2013

Happy National Chocolate Chip Cookie Day!!!

I love that just about every day is a holiday, whether it is big or small, and that most are celebrating food.  My kids have began to ask me each day, "Mom, what holiday is today?"  They look forward to doing something special with our meals, in one way or another. 


Today, is National Chocolate Chip Cookie Day!  I don't know anyone who wouldn't want to celebrate a chocolate chip cookie.  So it is only fitting that I share my favorite cookie recipe.  Soft, chewy, and filled with chocolate chips, you won't be able to get enough.

Chocolate Chip Cookies
2/3 cup Butter
2/3 cup Shortening or Coconut oil
1 cup Sugar
1 cup Brown Sugar
2 Eggs
1 tsp Vanilla
3 1/2 cups Flour
1 tsp Salt
1 Tsp Baking Soda
1 bag Chocolate Chips

Preheat oven to 350 degrees Fahrenheit.

In the bowl of a stand mixer, cream the butter, shortening, sugar and brown sugar until fluffy.  Add the eggs and vanilla.  Mix well.  Add the dry ingredients and mix until well blended.  Stir in the chocolate chips.

Using a cookie scoop, scoop dough onto parchment lined baking sheet.  Bake for 9-10 minutes.  Take them out when they look not quite done.  Let sit on the tray for 3 minutes then transfer to a cooling rack and try to let them cool, they are really that good.

** Variations **
Add 1 cup chopped pecans or walnuts.
Add 1-2 cups toffee chips along with the chocolate chips.

Tuesday, July 16, 2013

Key Lime Scones

Once in a while we like to get fancy here for breakfast.  The girls love having tea parties with scones, and peppermint tea.  When I woke up this morning I immediately thought of scones, and as I walked into my kitchen I spied my fruit bowl, filled to the top with lemons and limes (I love citrus!) and thought to myself...  I'm going to make key lime scones, they'll be delicious and the girls will love them, I hope.  Not only did the girls like them, but they licked their plates clean.  

Key Lime Scones
Makes 12-16 scones (depending on how big you cut them)

4 1/2 cups all-purpose flour
1 tbsp baking powder
1/4 tsp baking soda
1/2 cup sugar
1 1/4 tsp salt
zest of one lime, or 3 key limes
1 cup chilled butter, cut into 1/2 inch pieces
1/2 - 1 cup mini white chocolate chips
1 3/4 cups milk or heavy cream
for the glaze:
Juice of one lime or 3 key limes
1/2 cup powdered sugar
1/2 tsp vanilla
 
Pre-heat the oven to 400 degrees Fahrenheit.

In the bowl of your food processor place flour, baking powder, baking soda, sugar, salt and lime zest pulse to combine.  Add butter and pulse until it resembles a medium crumb. pour into a medium bowl and stir in chocolate chips.  Stir in milk until just combined.  Divide the dough into two equal portions.  Place one portion on a lightly floured surface and flatten with your hands to form a disc about 1 inch thick.  Using a pizza cutter, cut into 6-8 wedges and place on a lightly greased baking sheet.  Repeat with the remaining dough.

Bake for 20-25 minutes until golden brown.  

Meanwhile, in a small bowl, whisk all ingredients for the glaze and set aside.

Place on a wire baking rack and drizzle the glaze over the scones (I've found if I place the wire baking rack on a piece of aluminum foil it is much easier clean-up).  Enjoy!


Thursday, May 23, 2013

Best Banana Bread I've Ever Tasted

Banana bread is one of those things you either love or hate.  I myself love it!  I find it makes a wonderful breakfast, with a little cream cheese or real butter smeared across it, YUM!  It is a great way to use up bananas that might find their way in the trash, and it also makes a wonderful gift for a neighbor who may need a little cheering up.

I especially love the little surprises I've added to my "go to" recipe to make it over the top.


Banana Bread
Makes 1 loaf

1/2 cup butter, softened
1 cup sugar
2 eggs
1 cup overripe bananas, mashed (2-3 bananas)
1/4 cup milk
1 tsp lemon juice
2 cups flour
1 1/2 tsp baking powder
1/2 tsp baking soda
1/4 tsp salt
1/2 cup Hershey's Cinnamon Chips (my extra ingredient)
1/2 cup chopped nuts (walnuts and pecans are wonderful in this) *optional

Preheat oven to 350 degrees Fahrenheit.  Grease an 8x4x3 inch loaf pan.

In the bowl of a stand mixer, fitted with the paddle, whip butter and sugar until it is light and fluffy.  Add the eggs one at a time, beating well between each addition.  Add the bananas, milk, and lemon juice, and mix well.  Add the dry ingredients and mix until everything is combined.  Stir in cinnamon chips and nuts.  Pour into prepared pan and bake for 1 hour, or until a toothpick inserted in the center comes out clean.


Wednesday, May 22, 2013

Carrot Cake with Spiced Cream Cheese Frosting

The other night my youngest daughter and I were watching Throwdown with Bobby Flay.  It was a carrot cake throwdown, and she was glued to the show.  As soon as the credits rolled, she looked at me with her big blue eyes and said, "Mom, we HAVE to make a carrot cake tomorrow!  It HAS to have cream cheese frosting too!".  How could I say no to that!?!  So, I kept my promise and we made a delicious carrot cake with spiced cream cheese frosting for dessert after Sunday dinner.  All I've heard since that day is, just how good it was and that both of my girls love carrot cake now.  I love that they have great taste!

Carrot Cake with Spiced Cream Cheese Frosting
Serves 12

2 cups all-purpose flour
2 tsp baking powder
2 tsp baking soda
2 tsp ground cinnamon
1/2 tsp nutmeg
1 tsp salt
1 1/4 cup unsweetened applesauce
4 eggs
1 cup sugar
1 cup packed brown sugar
1 tsp vanilla
4 cups grated carrots (about 4-5 large carrots)
1/2 cup dried currants or raisins
1 cup chopped pecans

Preheat oven to 350 degrees Fahrenheit.  Grease and flour two 9 inch round cake pans.

In a medium bowl, stir together the flour, baking powder,baking soda, cinnamon, nutmeg and salt.

In the bowl of a stand mixer, combine applesauce, eggs, sugar, brown sugar, and vanilla.  Mix until the mixture looks light and pale in color, about 3 minutes on med-high speed.  Add 1/3 of the flour mixture and mix until just combined, continue adding flour mixture in thirds until it is just combined. Fold in carrots, currants, and 1/2 cup of the pecans, until thoroughly combined.

Divide batter evenly between prepared pans, and smooth out the tops.  Bake for 40-50 minutes or until a toothpick inserted in the center comes out clean.  Cool in the pans for about 10 minutes, then continue completely cool on a wire rack.

Spiced Cream Cheese Frosting
1 stick of butter, at room temperature
2 8 oz  packages of cream cheese, at room temperature
1 tbsp vanilla
5-6 cups of powdered sugar
1/2 tsp ground cinnamon
pinch of salt

In the bowl of  a stand mixer, beat the butter, cream cheese and vanilla until smooth, 3-5 minutes.  Gradually add the powdered sugar, cinnamon, and salt, and beat until light and fluffy, about 7 minutes.

To assemble the cake:
Using a serrated knife, level the tops of each of the cakes so they are flat.  Place one, cut side down on a serving platter.  Spread a generous spoonful of frosting on the first cake, spread evenly.  Place the other cake, right side up, on top and frost the top and sides of the cake.  Decorate with remaining pecans, if desired.  Enjoy!

Adapted from "The Back in the Day Bakery Cookbook"


Tuesday, May 14, 2013

Twenty Minute Tuesday - Turkey (or Chicken) Salad Sandwiches and bonus recipe, Home Made Pita Bread

Another quick meal idea for a crazy Tuesday.  The hubs has been picking up overtime shifts left and right, so I am beginning to feel like a single mom.  I'm so thankful for a hardworking hubs who wants me to be home with our girls, so in return, I am working hard to make sure he has healthy meal options to take to work.

Tonight is quick, easy, delicious, and uses minimal ingredients.  I always plan for this particular meal after we've had a roast turkey, or chicken.  It is a perfect way to give new life to leftovers and also makes a fantastic picnic too.

There aren't really exact measurements on this recipe, it is more of a "how you like it" recipe, but here is the general idea.

Turkey (or Chicken) Salad

leftover turkey, or chicken, cut into small cubes
3-4 ribs of celery, chopped
2 shallots, minced
small handful of craisins
zest of one lemon
juice of 1/2 -1 lemon
mayonnaise, enough to bind the ingredients together, but not to make them soggy
salt and pepper to taste

In a medium bowl, mix the turkey, celery, shallots, craisins, and mayo together.   Add lemon zest, lemon juice, salt and pepper.  Spoon filling onto bread or into pitas, add lettuce and enjoy.


Pita Bread
adapted from King Arthur Flour

3 cups All-Purpose flour
2 tsp instant yeast
2 tsp sugar
1 1/2 tsp salt
1 cup warm water
2 tbsp olive oil

In a stand mixer fitted with a dough hook, combine all ingredients to form a rough dough. Continue to mix for 5 minutes until dough is elastic and smooth.

Place dough in a lightly greased bowl and let it rest for 1 hour.  It may not double in size but it will become puffy.

Divide the dough into 8 equal pieces, roll each piece into a ball.

Pre-heat oven to 500 degrees Fahrenheit.

Using a rolling pin, flatten 4 of the dough balls into 6 inch circles.  (they don't have to be perfect circles, mine are far from perfect).  Place them on a lightly greased baking sheet.  When the oven has reached temperature, place the baking sheet on the bottom rack of the oven.  Cook for 5 minutes.  Move to the middle of the oven and bake again for 2 more minutes (this is to brown the pitas).

Remove from the oven, and cool by wrapping them in a clean dry towel (flour sack towels work best for this part).

Repeat with the remaining dough.

Store them in a plastic bag.

Friday, April 12, 2013

Artisan Bread

Have you jumped on this bandwagon yet?  I've read about baking bread in a Dutch oven for a couple of months now, but didn't take the few minutes to actually make it.  Until the other night.  I finally decided to mix it up and give it a try.  It raises for 12-18 hours so, mix it up before dinner and bake it after breakfast.  Your whole house will smell heavenly!  There is no kneading involved, so just mix, raise, shape, and bake, then you end up with a loaf of bread that looks like you've just stopped by a bakery. 
When I pulled my first loaf out of the oven, the Hubs and I got close to smell it and heard the crust crackling away.  Waiting for it to cool was the hardest part.  Both of us were ready to just tear into it.  When we did slice it up, it didn't last very long.  So, last night we mixed up two more loaves.  I can't wait to experiment even more with this easy recipe.
Dutch Oven Bread
makes one 1 1/2 lb loaf
adapted from From Dahlias to Doxies


3 cups all-purpose flour
1 3/4 tsp salt
1/2 tsp yeast
1 1/2 cups water
any add-ins that you choose (I'll list the one's we've tried or want to try below)


In a large bowl, stir together flour, salt, and yeast.  Add water and mix until combined.  If you are adding flavors to your loaf, fold them in now.  Cover the bowl with plastic wrap and set aside to let it raise for 12-18 hours.


After the 12-18 hours, place your dutch oven with lid in the oven and preheat your oven to 450 degrees Fahrenheit.   Heat your dutch oven for 30 minutes (double check your the info that came with your dutch oven and make sure it can be heated empty.  I have one that can and one that cannot). Meanwhile, dump your dough out onto a heavily floured surface (you can also dump it on a heavily floured cotton towel or piece of parchment to make it easier to transfer to dutch oven), shape it into a ball then cover with plastic wrap or another cotton towel until the pot is ready.  Once the pot is hot, remove the lid, and drop the dough inside.  Do not grease the pot!  Replace the lid and bake it for 30 minutes.  Don't peek, just leave the lid on and enjoy the wonderful smells wafting through your house.  After the 30 minutes remove the lid, bake for another 15 minutes.  Remove the bread from the dutch oven and set on a rack to cool.


The first loaf we made we just followed the instructions, the second we added chopped kalamata olives, and the third we turned into a rye loaf that is to die for!  Here's what we did, and what we plan to do too.

Kalamata Olive Bread add-ins:
1/4-1/3 cup chopped kalamata olives

Rye Bread add-ins:
replace the 3 cups of All-purpose flour with 2 cups all-purpose, and 3/4 cup whole wheat, 1/4 cup rye flour
2 tsp caraway seeds (I "roughed up" half of them in my mortar and pestle to release extra flavor)

White Chocolate Pecan:
Add 1/2 cup chopped pecans and 1/2 cup white chocolate chips

Dark Chocolate Cherry Bread
Add 1/2 cup semi-sweet or dark chocolate chips and 1/2 cup chopped dried cherries

The possibilities are endless, let your creativity run wild with this one!

Monday, April 8, 2013

Dutch Crunch Rolls

During our first year of marriage, The Hubs and I lived in the Bay area of California. We loved it there. Beautiful weather, tons of ethnic food choices, and incredible bread. I mean, Sourdough bread should not be made anywhere except the Bay area. It just isn't the same... One other bread we grew to love was Dutch Crunch bread. A soft white roll, covered in a crunchy topping. For years The Hubs would mention to me that he really missed them, but I never thought to attempt to make them myself.  I am so glad I got over it and took the plunge.  These incredibly easy, and equally delicious rolls pack a punch with the crunchy topping.  I can't wait to make them again!

Dutch Crunch Rolls
makes 12 rolls or 2 loaves of bread

Rolls:
1 tbsp active dry yeast
1 1/4 cup warm water
2 tbsp instant dry milk
1 1/2 tbsp sugar
2 tbsp canola or olive oil
1 1/2 tsp salt
up to 4 cups of all-purpose flour

In the bowl of a stand mixer combine yeast, water, milk, and sugar.  Stir to combine and let it sit for 5 minutes to allow the yeast to "bloom".

Add the oil, salt, and two cups of the flour.  Mix on low until the dough comes together, scraping the sides down with a rubber spatula.

Add the remaining flour1/4 cup at a time until dough pulls away from the sides of the bowl.  Mix for 4 minutes.

Place in a greased bowl, cover and raise until doubled in size.

Divide dough into 12 equal pieces, or two for loaves.  Shape each portion into a ball, or loaf and place on a parchment lined baking sheet.

Cover with plastic wrap and let sit while you make the topping. (approximately 20 minutes)


Dutch Crunch Topping:
2 tbsp active dry yeast
1 cup warm water
2 tbsp canola oil
1/2tsp salt
1 1/2 cup rice flour (gluten free, Bob's Red Mill is my favorite)

Combine all ingredients in a large bowl and whisk hard to combine.  It should be stiff like a royal icing.  Add more rice flour or water if necessary.  Let it stand for 15 minutes.

Spoon a thick layer onto each roll/loaf and spread around evenly.  Be generous with the topping, it will not crack if it is too thin. 

Bake at 380 degrees Fahrenheit for 25-30 minutes.  Transfer to a wire rack to cool.


Saturday, March 30, 2013

Toasted Onion Buns

It seems that as the weather gets warmer, and stays consistently warmer, more and more of our neighbors are firing up their BBQ's, filling the air with that wonderful smell of smoke.   As dinner time approaches you can almost pick out what everyone is eating for dinner (thanks to condo life), and more often than not it is the smell of Hamburgers.  The Hubs loves a good toasted onion bun for his burgers, pulled pork, or even chicken sandwich.  This recipe seems to fit that bill.  With a subtle onion flavor, this moist bun can hold up to even the sloppiest of sandwiches.

Toasted Onion Buns 
Makes 8 buns
1 cup warm water
2 tbsp softened butter
1 large egg
3 1/2 cups All-purpose flour
2 tbsp vital wheat gluten
1/4 cup sugar
1 tsp salt
1 tbsp instant yeast
1 tsp onion powder
2 tbsp dried toasted onions, plus more to top buns if desired

Combine all the ingredients in a stand mixer and mix, using the dough hood for 8 minutes.  You will have a soft, smooth dough.  Place the dough in a lightly greased bowl and cover it with a clean towel or plastic wrap.  Let it raise until doubled in size, about one hour.

Lightly punch down the dough, divide it into 8 pieces (about 4 ounces each), and shape each piece into a flattened ball.  Place the buns on a greased baking sheet  and let raise 30-40 minutes until they are quite puffy.

Preheat the oven to 375 degrees Fahrenheit.  bake the buns for 12 to 15 minutes, until they are golden brown.  Remove them from the oven and cool on a wire rack.  Split buns, fill with your favorite burger, or sandwich and enjoy.

For Hot Dog Buns: (These would be incredible with a Chicago style dog)
Divide the dough into 10 equal pieces, roughly 3 ounces each.  roll into a log shape the length of a hotdog and flatten slightly, let raise 30-40 minutes.  Follow baking instructions.


Saturday, March 23, 2013

Breakfast Biscuit Sandwich

I love breakfast!  I don't know how many times you'll read that on this blog, but I really do love breakfast.  I especially love savory breakfasts.  A few years ago, I started searching for the perfect biscuit recipe to add to my collection.  I tried many different recipes found online and pinterest, and finally I started searching cookbooks.  One of my first stops was one of Paula Deen's cookbooks.  I was surprised to find her recommendation was to buy a bag of the frozen ones, bake them, hide the evidence and claim them as your own.  As good as the frozen ones are, and we all know they are yummy!  I was, and am, trying to steer clear of processed and packaged foods for my family, so the hunt continued.  I came across one book that caught my eye, Southern Biscuits by Nathalie Dupree and Cynthia Graubart, unfortunately it was out of stock on Amazon, so I waited.  Believe me it was worth the wait.


A good breakfast sandwich has to start with a really great biscuit.  So far, this recipe is my favorite.

Baking Powder Biscuits
2 cups all-purpose flour, plus some for dusting
1 tbsp baking powder
1 tsp salt
1/4 cup chilled shortening, lard, and/or butter, roughly cut into 1/4 inch cubes
AND
1/4 cup chilled shortening, lard, and/or butter, roughly cut into 1/4 inch cubes
1 cup milk or buttermilk, divided
softened butter, for brushing

Preheat the oven to 425 degrees F.

Lightly spray a cookie sheet with baking spray.

In a large bowl whisk together flour, baking powder, and salt.  Scatter the first 1/4 cup pieces of chilled fat (doesn't that sound delicious?) throughout the flour mixture.  Using a pastry cutter, two forks, or your fingers, work the fat into the flour mixture until the mixture resembles well-crumbled feta cheese.  Add the additional 1/4 cup fat to the mixture and continue to work it in until no pieces remain larger than a pea.  If this process took longer than 5 minutes place the bowl in the refrigerator for 5 minutes to re-chill the fat.

Make a deep well in the center of the flour, pour 3/4 cup of the milk into the well, reserving 1/4 cup, and stir with a rubber spatula or large metal spoon, using broad circular strokes to quickly pull the flour into the milk.  Mix just until the dry ingredients are moistened and the sticky dough begins to pull away from the sides of the bowl.  If there is remaining dry flour, add the reserved milk one tablespoon at a time.  If the dough is too wet, use more flour when shaping.

Lightly sprinkle flour on a clean surface.  Turn dough out on to the surface and sprinkle the top lightly with flour.  With floured hands, fold dough in half and pat into a 1/3-1/2 inch round.  Fold in half again.  Repeat if the dough is still clumpy.  Pat the dough out into a 1/2 inch thick round for a normal biscuit, 3/4 inch thick for a tall biscuit, and  a 1 inch thick for a giant biscuit.  Brush off any visible flour from the top. 

Using a 2 1/2 inch round biscuit cutter, cut biscuits very close together, being careful not to twist the cutter.  The scraps may be combined to make additional biscuits (the scraps will make tougher biscuits, but no one in my family ever seems to complain about them).

Bake biscuits on the top rack of the oven for 10-14 minutes until light golden brown.  You can rotate the pan after 6 minutes of baking to ensure even cooking.

When biscuits are done, remove from the oven and lightly brush the tops with softened butter.  Serve hot.

Makes 4-12 biscuits depending on size

*I prefer using butter for both of the fat options.  I've used shortening too, and it works great, but we prefer the flavor that the butter provides.

*Dessert variation - Add 3 tbsp sugar to the flour mixture, replace one or both of the fat options with coconut oil.  When biscuits are done, cut in half, fill with fresh whipped cream and sliced strawberries, top with more strawberries.  These make wonderful Shortcakes.

To finish off your Sandwich
Add one or two eggs per person, prepared however you like (we prefer scrambled for these delicious sandwiches), cheese if desired, and a slice of ham, sausage, or a couple slices of bacon.  Enjoy

Thursday, March 21, 2013

Happy Birthday to the Hubs and a Delicious Yellow Cake

I love birthdays! I love spoiling the person celebrating their special day with their favorite foods.  It is the one way I can always guarantee they'll get something they love ;)  Today we celebrated the hubs.  He always requests normal food, nothing too out there, but when it comes to his cakes, he loves to test my creativity.  In the past he's asked for a cake that looks like a hamburger, bratwurst and fries, a BBQ grill loaded with burgers and more, and a bucket of popcorn.  This year I didn't expect anything other than a challenge.  He came to me a few weeks ago and requested a "narwhal" cake.  I found it perfectly fitting. We've developed a slight obsession with narwhals at our house.


The morning began with omelets. bacon, and cake batter pancakes.
The completed narwhal cake.  He LOVED it!  I enlisted his help this year to be my soux chef/designer... I know, making him work on his own cake wasn't ideal, but he's an awesome sculptor.  He took care of the tail, horn, and narwhal head, sculpting them out of rice krispie treats, while I conquered the rest, then I stuck them all onto the cake and frosted away.


After dinner we invited some friends and family to join us for cake and ice cream.  Luckily they all came so we don't have to eat the whole cake :)

Happy Birthday Hubs!  I'm so glad you are mine forever!  Hope your day was just what you wanted!

The actual cake was delicious!  My new favorite! 

Classic Yellow Cake
Makes 2 8-9 inch rounds or 1 9x13

12 tbsp butter
1 3/4 cups sugar
3/4 tsp salt
2 1/2 tsp baking powder
2 tsp vanilla extract
4 large eggs, plus 2 egg yolks
2 3/4 cups all-purpose flour
1 1/2 cups milk, buttermilk, or yogurt

Preheat oven to 350 degrees Fahrenheit.

In a large mixing bowl, cream together the butter, sugar, salt, baking powder, and vanilla until fluffy and light.  At least 5 minutes.

Add the eggs to the butter mixture one at a time, beating well after each addition.  Slowly blend one third of the flour into the creamed mixture, then half the milk, another third of the flour, the remaining milk, and the remaining flour.  Be sure to scrape the sides and bottom of the bowl occasionally throughout this process.

Pour the batter into greased and floured pans.  Bake 23-26 minutes (for 8 inch pans), 25-30 minutes (for 9 inch pans), or 35 minutes for a 9x13 pan.  Remove cakes from the oven, cool in the pans for about 10 minutes, then turn onto a cooling rack and cool completely before frosting.


Monday, March 18, 2013

Rainbow Bread

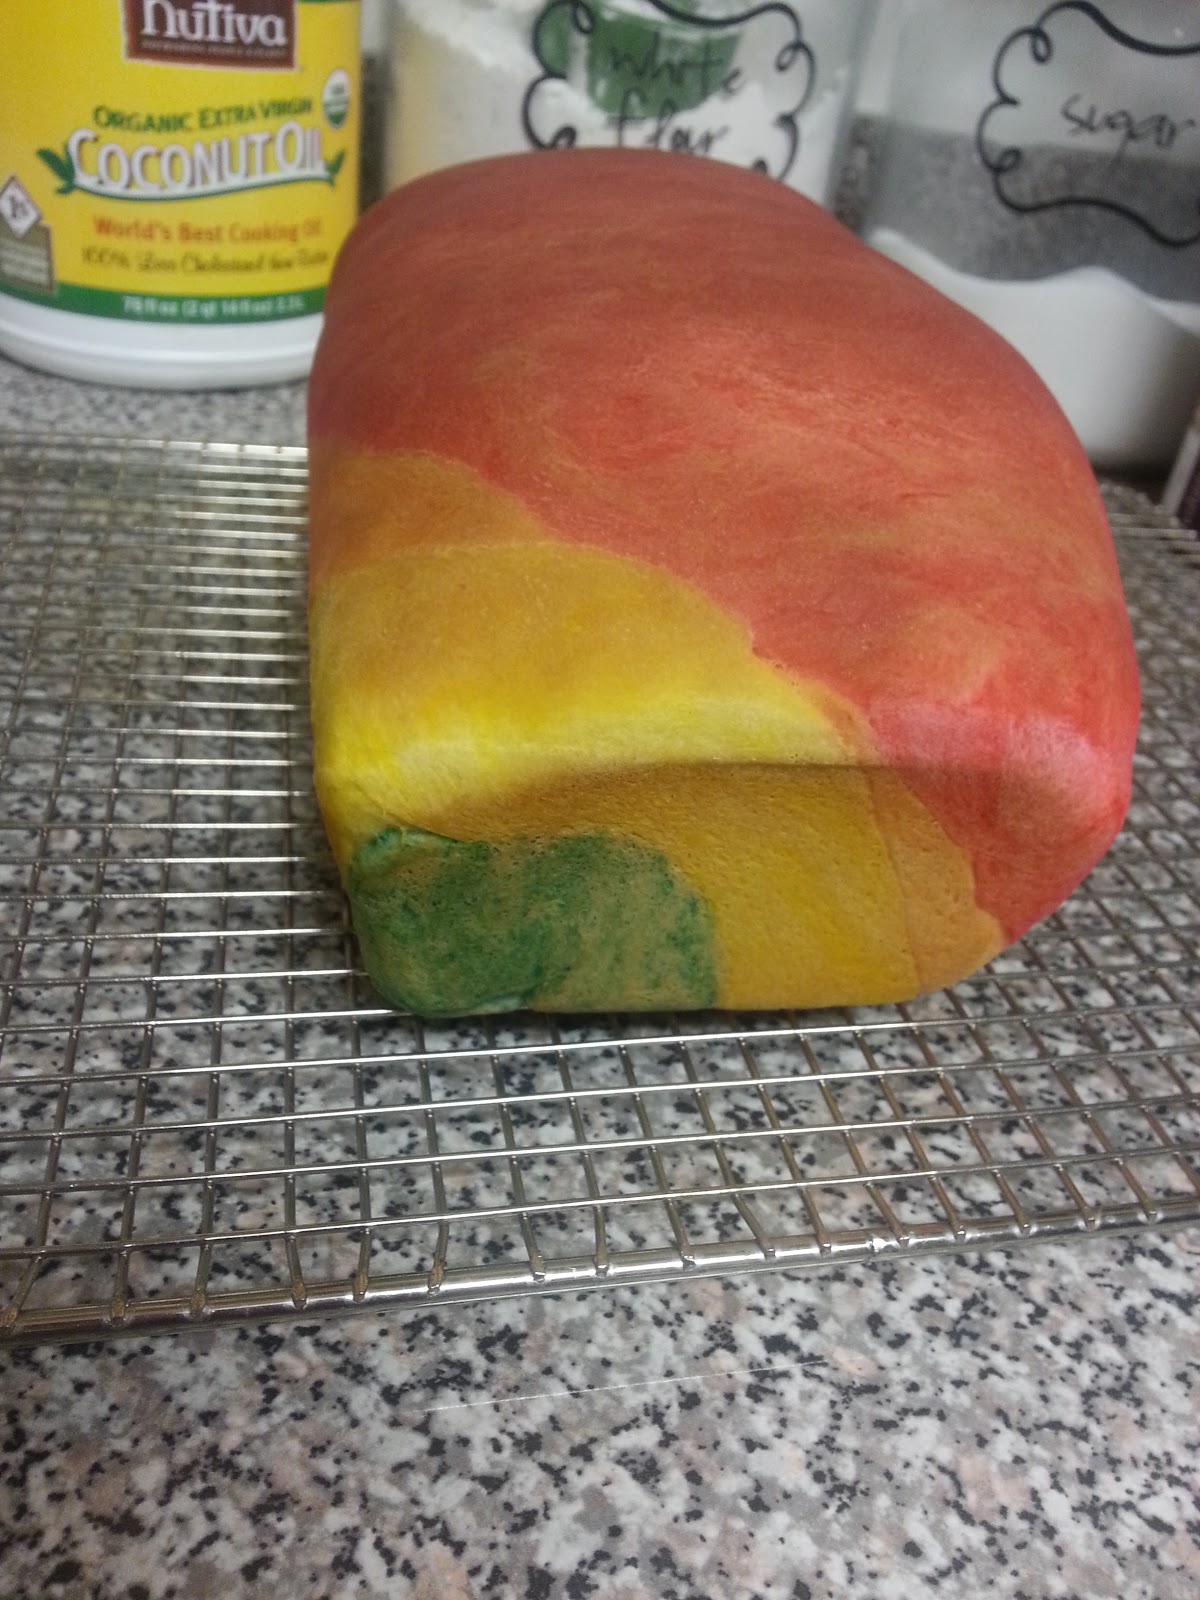
I've seen a few pins floating around pinterest of this beautifully colored rainbow bread and tucked the idea away for St. Patrick's Day for my girls.  I knew I needed to do something fun to jazz up their lunch, but I don't like to experiment with new bread recipes when I don't have the time.  So, I improvised... I used my favorite bread recipe and did it my way :)  Luckily it turned out just perfect (well other than that pesky air bubble that formed right in the middle of the loaf...  next time it'll be perfect!  Either way, the girls loved it!  They both kept commenting that it was the coolest bread they'd ever eaten. 


Rainbow Sandwich Bread
3 cups white flour
2 1/4 tsp instant yeast
1/2 tbsp salt
3 tbsp sugar
1/4 cup dry milk
1/2 cup potato flakes
3 tbsp softened butter or oil
1-1 1/8 cup warm tap water

In the bowl of a stand mixer fitted with a dough hook measure flour, yeast, salt, sugar, dry milk, and potato flakes.  Mix for 30 seconds to combine.  Add the butter/oil, and about 7/8 cup warm water.  Mix for about 30-60 seconds, adding more water a tablespoon at a time if dough is too dry.  If the dough is too wet, add flour one tablespoon at a time until desired consistency is achieved.  The dough should be wet enough to leave a little residue on the sides of the bowl.  Mix for 4 minutes. 

Divide dough into 6 equal portions.  With each portion add 3 drops of food coloring (or more to get the color you desire) and knead the coloring into the dough.  It will take about 5 minutes per portion to get it mixed in.  Flatten out each piece into a 2 inch by 6 inch rectangle and stack them all together starting with purple on the bottom, then blue, green, yellow, orange, red. 

Using a rolling pin, flatten dough and roll to about 1/2 inch thick.  Starting at one end, roll the dough to form a loaf.  Place it in your pan that has been lightly greased with butter or cooking spray and cover.  Let it raise until it has doubled in size.

Meanwhile, preheat your oven to 350 degrees Fahrenheit.  When dough has risen to double the size bake for 25 minutes.  Remove from the oven and let it cool in the pan for 10 minutes.  Then remove from pan and cool completely on a wire rack. 

Makes 1 5x9 inch loaf.

Mint Brownies

St. Patrick's Day at our house is taken quite seriously. I spent the week sewing green dresses and making green necklaces for my two girls.  We started the day with Green Apple Pie waffles, then had lunch on Rainbow Bread (watch for the recipe tomorrow), and finished off the day with a very traditional St. Patrick's Day meal, Corned Beef and Cabbage, Boiled Potatoes, and Irish Soda Bread.   We finished off the meal with Mint Brownies, one of my absolute favorites.

I took a few different recipes and combined my favorite aspects of each to create these decedent, fudgy, and perfectly minty brownies that sent the meal right over the top.
Mint Brownies
Makes a 9x13 pan

Brownies
4 squares unsweetened baking chocolate (4 ozs)
1 cup butter (2 sticks)
4 eggs
2 cups sugar
1 tsp vanilla
1 1/4 cups flour
1/2 tsp baking powder

Preheat the oven to 350 degrees Fahrenheit.  Lightly spray a 9x13 pan with cooking spray and set aside. 

Chop the unsweetened chocolate and butter into chunks and place both in a microwave safe bowl.  Microwave for 30 second intervals, stirring in between each interval, until just melted and smooth.  Set aside to cool, stirring occasionally.

In the bowl of a stand mixer (you can also use a hand mixer) beat eggs, sugar, and vanilla for 2 minutes.  While mixer is running, slowly pour melted chocolate mixture into egg mixture and beat to combine.  Combine the flour and baking powder then add to chocolate mixture, and mix until just combined.  Pour the batter into a prepared pan and bake for 20-30 minutes or until a toothpick inserted in the center comes out clean. 

Cool completely on a metal rack.  When brownies are cool, prepare the frosting.
 
Frosting
1/4 cup butter, room temperature
1 pkg (8ozs) Neufchatel cheese, room temperature
1 tsp mint extract
4 drops green food coloring
4 cups powdered sugar
1/4 cup heavy whipping cream

In the bowl of a stand mixer, beat butter, and neufchatel cheese until light and fluffy, about 3 minutes.  Add mint extract and food coloring, mix to combine.  Add powdered sugar and beat until combined, then drizzle in the cream while the mixer continues.  Whip for 3 more minutes.  Spread evenly over the cooled brownies.

Chocolate Ganache
2 cups semisweet chocolate chips
1/2 cup heavy whipping cream

In a double boiler melt chocolate, stir in whipping cream.  Continue stirring until well combined.  Cool to room temperature and pour over the mint layer and spread evenly.  Let the brownies sit in a cool area to allow for the ganache to set up.  


I found that the biggest challenge with these wonderful brownies is eating just one.  My oldest came to me tonight and asked for a second brownie.  I told her I was still to full from dinner to even watch her eat it, and she replied, "Mom, I will hide in the kitchen and eat it so you don't have to watch me".  How could I say no to that.  Hope your St. Patrick's Day was lucky, and full of tasty treats!

Recipe adapted from Our Best Bites and Culinary.net

Monday, March 11, 2013

Cannoli Pie

Ever have one of those days where you just need something sweet to end the day?  Today has been one of those days, but I had no idea what to make.  So, I opened up the refrigerator and took a quick inventory.  There really wasn't much to choose from...  A lot of fruit, some ricotta cheese, and a few other odds and ends.  That ricotta stuck out, so I started searching for recipes.  When the picture of Cannoli pie popped up on my screen I knew that was it.  I am a sucker for cannolis, so we gave it a whirl.  Now when I get the urge for a cheesecake, I think this will be my  "go to" recipe.  Very similar texture and flavor, but also tastes just like a fresh cannoli.  Give it a try, you will love it too!


Cannoli Pie
15-oz ricotta cheese
14-oz sweetened condensed milk (1 can)
2 large eggs
1 tsp vanilla extract
1/4 tsp ground cinnamon
2 tsp lemon zest (optional)
1/2 cup miniature chocolate chips
1 prepared 9 inch shortbread crust

Preheat the oven to 350F.
In blender or food processor combine ricotta cheese, sweetened condensed milk, eggs, vanilla, cinnamon and lemon zest and blend until very smooth. Pour into prepared 9-inch pie shell. Sprinkle the top evenly with mini chocolate chips, but do not stir them in.
Bake for 40-45 minutes, until pie is set and jiggles only slightly when you push the edge of the pan.
Allow to cool completely before serving.
Serves 8.

Adapted from http://bakingbites.com/

Wednesday, February 27, 2013

Pulled Pork Sliders and Ciabatta Buns

I am so ready for summer... I thought if I made a meal that was reminiscent of summer it would help me get over the never ending feeling of "this winter is never going to end". Pulled pork is always a hit around here, and I had everything for coleslaw in the refrigerator, so this meal was meant to happen.

For the pork I use this recipe from Little Blue Boo.  It is always delicious and full of flavor.  I like to add the bbq sauce to the meat after shredding.  And a big bonus... it freezes so well!

The coleslaw recipe was one that I have combined a couple of favorites to make this perfect combo.

Cole Slaw
1/2 head of cabbage, sliced thin, or shredded
1-2 carrots shredded
1/2 cup mayonaise
1/4 cup sugar
1 tbsp apple cider vinegar
1/2 tsp celery seed
1 tsp chopped chives

combine the mayo, sugar, vinegar, celery seed, and chives in a large bowl.  Whisk until well combined.  Add in the cabbage and carrots, stir to combine then refrigerate until ready to use, at least 30 min.


I have tried so many different recipes for hamburger buns, and was just about to give up when I came across this roll recipe.  We gave it a try and it has become our favorite go to recipe for buns.  They are simply wonderful, and incredibly easy!

Ciabatta Buns
1 1/2 cups very warm tap water

1 tsp instant dry yeast
1 tsp sugar
1 tsp salt
2 tbsp olive oil
3 1/2 cups all purpose flour

In a stand mixer, add water, yeast, sugar, salt and olive oil.  Stir to combine.  Add the flour.  Mix on low for 7-10 min.  Dough will be sticky.  Place dough in a large, lightly greased bowl and place in a warm, draft free place.  Cover with plastic wrap or a clean, dry kitchen towel.

When the dough has doubled in size, gently punch it down and divide the dough into 8 equal pieces for regular size buns, and 21 equal pieces for sliders.  Place on a greased cookie sheet and cover with the towel again.  Let buns raise for about 30 minutes or until double in size.

Preheat the oven to 400.

Bake for about 20 minutes or until the rolls are golden brown and sound hollow when tapped.  Transfer to a wire rack and cool.


Saturday, February 9, 2013

My Favorite "Go-To" Pizza Crust

We LOVE home made pizza.  Okay, okay...I just love pizza! Our budget won't allow me to order pizza as often as I'd like to, so this has become a staple in our weekly menu planning.  It is quick, easy, and oh so tasty.

Pizza Crust
1 1/2 cups warm water
1 tbsp yeast (I like to use instant yeast for this.  Raises even quicker :) )
1 tbsp sugar
1 tsp salt
1 tbsp oil
3-4 cups flour (I do half and half/wheat and white)

Combine the first 5 ingredients in a stand mixer (or a bowl if mixing by hand).  Add flour until combined.  Knead for 5-7 minutes.  Let raise for 30 min (if using instant yeast it will be raised in about 10-15 min.).  Divide dough in half.  Roll out into circles. Top with your choice of sauce/cheese/toppings.  Bake at 425 for 15 min.

My Tips/Tricks
1.  I divide my dough into 4 equal pieces.  I prefer a thinner crust, and this makes it just perfect.
2.  After rolling out dough, I place the circle in the oven on a heated pizza stone to cook for a few min before adding toppings.  That way the crust can be frozen for a later time, it also helps make sure the crust gets cooked completely.
3.  Don't overload your pizza.  It is very possible to have "too many" toppings.

Thursday, October 11, 2012

Soft Ginger Cookies

I am a sucker for fall flavors...  There is just something about cinnamon, nutmeg, cloves, and ginger that warm your soul.  I especially love ginger cookies!  Soft, chewy, and delicious.  I had a friend ask me for a good cookie recipe a few days ago and it got me really thinking about these cookies, I immediately had to make a batch, okay... a double batch, for my family.  

Big Soft Ginger Cookies
3/4 cup butter
1 cup sugar
1 egg
1 tbsp water
1/4 cup molasses
2 1/4 cups flour
2 tsp ginger
1 tsp baking soda
3/4 tsp cinnamon
1/2 tsp cloves
1/4 tsp salt
2 tbsp sugar
Pre-heat oven to 350 degrees F.  Cream butter and sugar.  Add egg, water and molasses, mix through.  Add remaining ingredients except 2 tbsp sugar.  Shape dough into balls (I use my cookie scoops) and roll in remaining sugar. Bake for 8-10 minutes.  Cool on a wire rack.

Monday, October 8, 2012

The BEST Muffins in the World

I love muffins! Blueberry, banana nut, chocolate, you name it, I'm sure I'll love it! The reason I love this recipe so much is because you get to be creative, and the possibilities are endless!
(pictured L-R, Chocolate chocolate chip, banana, and Pumpkin)

My younger sister took a foods class in college and this recipe was one that she brought home to share.  It is just your basic plain muffin, but you get to add whatever you want to make it yours :)  You can't get better than that now, right!?!

Basic Muffins
Yield 6 muffins (when you add stuff to them, you can easily get 9-12 muffins per batch)
1 cup flour
1/2 tsp salt
1 1/2 tsp Baking Powder
1/2 cup sugar
1/2 cup milk
2 tsp vegetable oil
1 egg

First, preheat your oven to 425 degrees F.  Line your muffin pans with liners or spray with nonstick spray.  

Stir together the dry ingredients.  Stir in milk, egg, and oil.  Stir 12-16 strokes, pour into muffin tins.

Bake for 15-20 minutes.

This is where you get creative :)

Add-ins:
3/4 cup Rolled Oats
2/3 cup brown sugar (omit the white sugar when adding this)
Substitute whole wheat flour

1/3 cup shredded cheese
4 strips of bacon, cooked and crumbled
reduce sugar to 2 tbsp
(yes it really is delicious!)

This one is a favorite!
1 chopped apple
1/2 cup apple juice concentrate
reduce sugar to 2 tbsp
omit milk
(I always add a bit of apple pie spice or cinnamon and nutmeg - YUM!)

2 tsp Poppy Seeds
1/2 tsp lemon extract  or 2 tbsp fresh lemon juice
zest of one lemon

2 tsp poppy seeds
1/2 tsp vanilla extract
1/2 tsp almond extract

replace flour with:
3/4 cup cornmeal
1/4 cup flour

2 tbsp cocoa powder
1/4 cup chocolate chips

1/2 cup pumpkin puree
1 1/2 tsp pumpkin pie spice

Any of the following:
1/4 cup blueberries, washed and dried
1/4 cup chopped nuts
1/2 cup shredded zucchini
1 cup shredded carrots
1/2 cup chopped apple (or 1/2 cup applesauce)
1 mashed banana
1/2 cup pumpkin puree
1/3 cup raisins
1/3 cup coconut
2 tsp cinnamon
2 tsp vanilla

You can reduce sugar to 2 tbsp with any of these add-ins if you are trying to cut back, the flavor is still wonderful!

Crumb topping:
1 tbsp melted butter
2 tbsp sugar
2 tbsp flour
Stir until crumbly, sprinkle on muffins right before baking.

I'd love to hear the combinations you come up with.  Try it out and post your personalized muffin favorites :)

Saturday, October 6, 2012

Pumpkin Cinnamon Rolls

Every Spring and Fall my family gathers together to listen to the leaders of our Church during LDS General Conference. We cherish this time to join as a family and learn at the feet of our Prophet and his Apostles. With it comes a tradition of our own. During the Fall sessions of Conference we also bake Pumpkin Cinnamon Rolls. These have become a tradition that we all look forward to.

This recipe was one that I found in a magazine while waiting in the waiting room for a pre-natal appointment with our second baby girl. It pretty much jumped out of the page and made my pregnant self crave them immediately. Lucky for me the nurse is a friend of mine, so she kindly copied the recipe for me to go home and try out. It was found in the Family Circle Magazine October 2009

Makes 24 servings
Dough:
2 1/4 tsp active dry yeast
1/4 cup warm water (100-110 degrees F)
1 tsp plus 2 tbsp sugar
2 eggs
1/4 cup (1/2 stick) butter, melted
1 can (15 oz) solid-pack pumpkin
5 1/2 cups all-purpose flour
3/4 tsp salt

 Filling:
1/2 cup (1 stick) butter, softened
1/4 cup sugar
1 cup packed brown sugar
1 tbsp cinnamon

Glaze:
2 cups confectioners' sugar
3 tbsp milk

1. Sprinkle yeast over warm water in a large bowl. Add 1 tsp of the sugar; let stand until foamy, about 5 minutes. Beat in remaining 2 tbsp sugar, the eggs, butter and pumpkin.
2. Gradually add 5 cups of the flour and the salt, scraping the sides of bowl, until soft dough forms. Turn out onto a floured surface, and knead remaining 1/2 cup flour into dough, adding more if sticky. Knead for 10 minutes, until smooth. Dough will be soft.
3. Grease a bowl; add dough, cover with plastic wrap and place in a warm spot until doubled in size, about 1 1/4 hours.
4.Coat 2 13x9 baking pans with nonstick spray. Make Filling: Mix butter, sugar and brown sugar, and cinnamon in a bowl.
5.Punch down dough. Roll out half onto a lightly floured surface to form a 16x10 rectangle. Spread with half of the filling. Starting with one long side, roll up jelly-roll fashion. Pinch seam close. Repeat with second half of dough and filling.
6. Cut each log crosswise into 12 generous 1-inch pieces. Arrange 12 pieces, cut side down, in each prepared pan. Cover with plastic wrap; let sit in a warm spot until doubled in size, about 30-45 minutes. (You can refrigerate one pan overnight or cover plastic with foil and freeze at this point. Thaw in fridge overnight, then thaw on counter while preheating oven.)
7. Heat oven to 350 degrees F. Uncover pans and bake buns until they are golden brown and bubbly, 28-33 minutes (thawed buns, 36 minutes). Transfer to a wire rack; let cool 10 minutes.
8. Glaze: Blend confectioners' sugar and milk. Drizzle over buns (about 1/3 cup per pan). Serve warm. 

Nutritional info: (per bun)
249 calories
7 g fat (4 g sat.)
4 g protein
45 g carbohydrates
2 g fiber
85 mg sodium
33 mg cholesterol

*Carrie's note* I love cream cheese frosting on my cinnamon rolls, so I skipped the glaze and frosted the warm rolls with cream cheese frosting. It does change the nutritional info, but oh my, it tastes good :)

Cream cheese frosting:
1 8 oz package cream cheese, room temperature
1 stick of butter, room temerature
1 pinch of salt
1 tsp vanilla extract
4 cups powdered sugar (or more depending on how thick or thin you want your frosting)

Whip together your cream cheese and butter, add the salt and vanilla. Gradually add the powdered sugar and whip until light and fluffy.

Friday, October 5, 2012

Crusty Soup Bowls

Fall at our house means hot soups, fresh breads, and a warm home. With the weather cooling down, and the leaves changing colors it is time for soup again. One of our favorite ways to enjoy soup is in a nice crusty bread bowl. I've attempted this many times, and most have failed miserably. Until this recipe came along. It is perfect! Crusty on the outside, soft and airy on the inside.
 Crusty Soup Bowls

yeilds 8 bowls
2 tbsp yeast
2 cups warm water
1 tbsp sugar
2 tsp salt
5 cups flour
3 tbsp wheat gluten
Cornmeal

In mixing bowl, dissolve yeast in warm water. Add sugar, salt, 3 cups of flour and wheat gluten.  Beat 3 minutes.  Gradually add remaining flour to make a stiff dough.  ( A stiff dough is necessary for the bowls to hold their shape).  Continue to knead in your mixer for 7 minutes, or by hand for 12 minutes on a lightly floured surface till dough is smooth and elastic.  Place in a greased plastic bowl, cover and let rise until doubled in size.  Punch down and divide into 8 pieces.  Form each piece into a ball and place on a baking sheet sprinkled with cornmeal.  Cover and let rise again until doubled in size.

Bake at 375  degrees F. for 25  minutes.

Let bowls cool.  Cut off the tops; scoop out bread to make a bowl, and serve with hot soup.


Related Posts Plugin for WordPress, Blogger...